# Django - Getting Started
_**This post was co-authored with fellow General Assembly Software Engineering Immersive member [JC Coles](https://jctech.blog/), following some custom suggestions from our instructor Adonis **_. Also, check out the entire ["Getting Started with Django" Series](https://blog.benhammond.tech/series/django)
If you've written full stack applications in JavaScript using Node, Express, perhaps Mongoose for accessing a database, maybe some packages like Passport to help manage user authentication and authorization, etc, you quickly find yourself repeating the same setup patterns over and over. The only differences come in when you accidentally misconfigure a setting or a route and spend hours debugging. Django aims to, if not _replace_ all of those steps, at least condense those disparate processes into one.
The following step-by-step guide will assist a beginning Python developer in launching a Django project on their local development server (and then [deploying it to Heroku in the next blog post](https://blog.benhammond.tech/deploying-django-to-heroku)).
> If you’re starting a brand new project, skip this section. Otherwise if you are downloading someone else’s project, run the following commands instead to properly configure it on your machine. This is the equivalent of running `npm i` when freshly cloning someone else's repo. When finished, continue at step "Creating a Home Page" below
1. `python3 -m venv .env`
2. `source .env/bin/activate`
3. `pip3 install -r requirements.txt`
4. `python3 manage.py migrate`
5. `python3 manage.py runserver`
6. Visit [localhost:8000](http://localhost:8000) in your browser
> Having issues?
- if your project contains environmental variables, add them to an `.env` file inside your inner project folder (mine is `pedalcollector_project/.env`)
- try reseting your database (you'll lose anything you've added so be careful!) `DROPDB {{{your_database}}}` and `CREATEDB {{{your_database}}}`
- in settings.py, to run locally you'll want `DEBUG=True`; to deploy securely you'll have to change to `DEBUG=False`. I manually set an env variable in each environment and then `DEBUG` will be set automatically.
# Django Environment Setup (New Project)
Python can and should be run in a virtual environment; this relates to the fact that your actual operating system utilizes Python code and by safely keeping your projects in a protected environment, you minimize the risk of accidentally misconfiguring your entire system. In short, you'll be simulating a mini-computer inside your computer, and running your Django project from there. You can quickly tell when your terminal is inside of the virtual environment by looking for the _(.env)_ at the beginning of your terminal prompt:

## New Folder
Create and navigate into a new folder that will contain your entire project
- `mkdir your_cool_thing`
- `cd your_cool_thing`
## Setup Local Git Repo
- `git init`
- `git add .`
- `git commit -m "initialize a cool thing"
- optionally connect to a remote Github repo at this point
## Virtual Environment
Create a virtual environment
- `python3 -m venv .env`
Activate it
- `source .env/bin/activate`
## Database
Create a postgres database. _You'll need this exact name again soon, so write it in your project notes somewhere you'll remember._
- `createdb example-db`
> `example-db` is the example I'll be using; you can use whatever you want throughout this post, just be consistent!
> If you have weird errors while testing things and somehow perhaps have corrupt data in your database, you can easily remove and re-add the database with the following commands in your terminal:
1. `dropdb example-db`
2. `createdb example-db`
3. `python manage.py createsuperuser`
## Dependencies
Install Django and dependencies. Psycopg2 helps Python interact with your postgres DB (similar to how Mongoose allowed Node to easily interact with MongoDB)
- `pip3 install django-extensions`
- `pip3 install Django`
- `pip3 install psycopg2`
> if that didn’t work run: `psycopg2-binary`.
- `pip3 install python-decouple`
> please note there is a difference between _python_decouple_ and _decouple_, you need the former.
Record those settings: _requirements.text_ is the Django equivalent of your Node app's _package.json_, informing everyone what settings and packages must be configured to function.
- `pip3 freeze > requirements.txt`
# Project Setup
Django _projects_ can contain multiple Django _apps_.
## New Project
Create a new project
- `django-admin startproject example .`
Make a file to secretly store your local environmental variables (a.k.a. config vars)
- `touch example/.env`
Make a git ignore file
- `touch .gitignore`
Specify the files and folders to ignore
- Open the blank `.gitignore` file in VSCode
> For a comprehensive `.gitignore` file like you might get from a create-react-app, you can visit [gitignore.io](https://gitignore.io) and select _Django_. This will generate a complete file for you: [click to view Django .gitignore](https://www.toptal.com/developers/gitignore/api/django)
- Whether you build your gitignore or copy and paste from the site above, be sure it includes the following items:
```
# this hidden folder contains your local, virtual environment
.env
# this hidden file contains sensitive keys and environmental config vars
example_project/.env
```
## Setting Up Environmental Variables
- in VSCode, open `settings.py` (inside your `example/` folder)
- scroll down to the line that declares the `SECRET_KEY=`, and **cut** the entire line (CMD+x)
- open the newly created `example_project/.env` file (it should be currently empty)
- paste in the secret key from above, but be sure to remove the empty spaces around the `=` and remove all quotes from the value after the `=`. You could also use any random secret string you like
- add in `ENVIRONMENT=development` on a new line
- add in `DATABASE_NAME=example-db` (or whatever you named your db that I told you to write down for later!)
Your .env file should end up looking like this:
```
ENVIRONMENT=development
SECRET_KEY={{{your_secret_key}}}
DATABASE_NAME=example-db
```
## Reading In Env Variables
Now, we want to make our app read these sensitive or configuration dependent variables, whether it is in production (e.g. deployed to Heroku) or development (working locally on your own computer). To read variables from the `.env` file you created and filled in the last step:
- open **settings.py**
- add `from decouple import config` at the top (right below the existing import)
- where you removed the `SECRET_KEY` line in **settings.py**, add back this line which will now read it dynamically (from your .env locally or your deployed config vars): `SECRET_KEY = config('SECRET_KEY')`
- scroll to the line that says `DEBUG=True` and replace with the following block:
```
if config('ENVIRONMENT') == "production":
DEBUG=False
if config('ENVIRONMENT') == "development":
DEBUG=True
```
- below, replace the line with `ALLOWED_HOSTS` with `ALLOWED_HOSTS = ['herokuapp.com','.localhost', '127.0.0.1', '[::1]']`
> If you will be deploying this somewhere else, replace Heroku with your actual app URL
## Main App
Back in your terminal (which should still have the environment activated), create a second app within this project called **main_app**
- `python3 manage.py startapp main_app`
> If you're having issues, make sure:
- you included the ` .` at the end of the start project command
- you might need to use the command `python` instead of `python3`; this seemed to occur on newer Macs or machines where `python --version` and `python3 --version` both referenced the same release of Python. The error popping up was a `raise ImportError` with the message `couldn't import django no module found`
Let Django know about your 2nd app:
- Open the project in VSCode: `code .`
- Open your project settings: `example_project/settings.py`
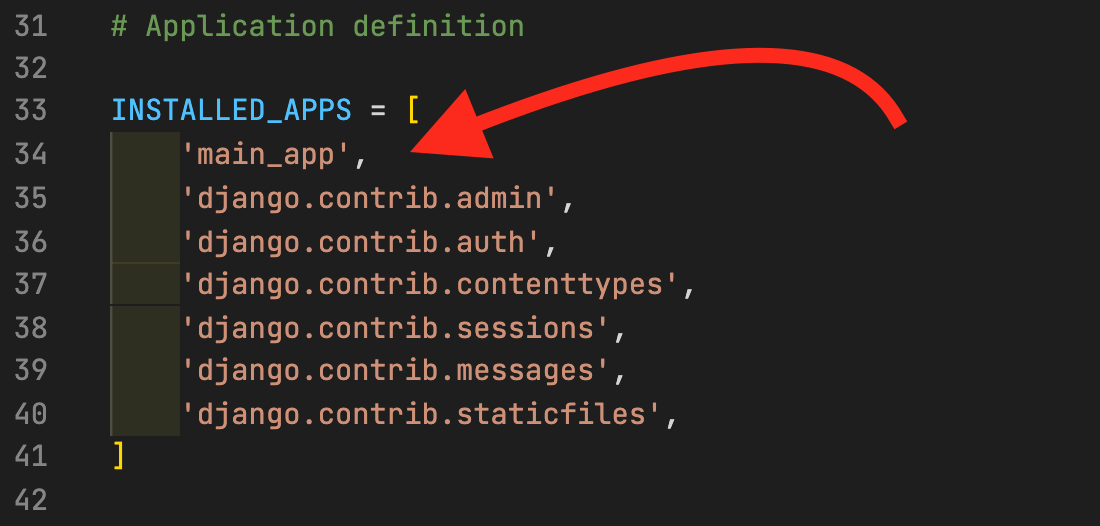
- Scroll down to `Installed_Apps` and add `main_app,` as the new first element in the array. Remember the comma!
## Development Server
Start up the development server on your local machine
- `python3 manage.py runserver`
- Open a browser and visit [localhost:8000](http://localhost:8000] to see your site (well, just the fun rocket for now... 🚀)
## Development Database
Configure the project for postgres by changing the database entry in **settings.py**, and reading the database name as an environmental variable.
```
# new database info
DATABASES = {
'default': {
'ENGINE': 'django.db.backends.postgresql',
'NAME': config('DATABASE_NAME'),
}
}
```
## Migrations
Stage the db migrations (kind of like git adding and committing, but for changes to the database schema as the app evolves over time
- stop the development server by going back to your terminal and pressing `CTRL+C`
- `python3 manage.py makemigrations`
(this probably won't do anything)
- `python3 manage.py migrate`
(this should run through the models in the app like the built in users, and add this info to your database)
Restart your server (you can do this regularly while debugging)
- start your server again: `python3 manage.py runserver`
# Creating a Home Page
## Add a `home` route
Routes are defined in the `urls.py` file(s); you _could_ add all of your routes to `example_project/urls.py`, but it is best practice for each Django app to define its own and include a link to the new URLs file in the project's URLconf:
- stop the server: `CTRL+C`
- `touch main_app/urls.py`
- Open the newly created file in VSCode
- Set up the imports and basic route using the code below:
``` python
from django.urls import path
from . import views
urlpatterns = [
path('', views.home, name='home'),
# more routes will go here
]
```
> Using an empty string `""` as the first parameter in `path()` is telling Django to route the base URL with no added paths to the home view (e.g. `your-project.com/` Later we will add more routes, for example using `"about/"` as the first argument in the new route, and linking that to an `about` page, which the user will access by going to `your-project.com/about`
Now, include this new file in the existing project’s urls.py
- Open `example_project/urls.py`
- Add a new item to the `urlpatterns` array, making sure the items are separated by commas
- Also you will need to import the `include` function before calling it in the array
- It will end up looking like this:
``` python
from django.contrib import admin
# from django.urls import path
# add include to your imports from django.urls
from django.urls import path, include
urlpatterns = [
path('admin/', admin.site.urls),
# add this line below
path('', include('main_app.urls')),
]
```
## Add a home view
Now that the home _route_ knows where to direct the client, you need to make a home _view_ as a connector between the current route and the correct template to render. Open up your **views.py** and add the following method:
```
def home(request):
return render(request, 'home.html')
```
## Add a home template
Starting very simply, you'll create the `home.html` file
- `mkdir main_app/templates`
- `touch main_app/templates/home.html`
- Open `home.html` in VSCode and paste in some valid HTML as a starting point:
> Tip: to save a step, in VSCode you could right click on **main_app** in the navigation bar, and select "New File", and then add the line `templates/home.html`. This will create the templates folder and also the html file in one command
```
Home
```
Back in your browser, visit [localhost:8000](http://localhost:8000) and refresh to view your sweet new home page. If it doesn't work, remember to restart your Django server:
- `python3 manage.py runserver`
# Done!
You should now have a functioning (very simple) Django app within your project, viewable on your local machine. To continue building, follow the next steps:
- Adding more routes, templates, and rendered data _(blog post currently being written)_
- Reading from your database _(blog post currently being written)_
- [Deploying your Django app on Heroku](https://blog.benhammond.tech/deploying-django-to-heroku)
__Cover Photo by Jukan Tateisi on Unsplash__
__Pedalboard Photo by Jonathan Dubon on Unsplash__